0%

270_golang检测软件更新示例

QQ群:397745473

270_golang检测软件更新示例

概要

最近遇到一个需求,golang应用部署在远程机器,远程机器在内网,部署之后不方便再次登录此远程机器去升级。

因此,需要golang应用自动检查是否需要升级,如果需要升级,则下载二进制后自升级。

自升级库

golang自升级的库有好几个,比较之后决定采用: https://github.com/jpillora/overseer
此库不是最全面的,但是实现原理和提供的接口比较简单,代码量也不大,便于定制。

overseer 库简介

overseer 将升级的程序启动在主协程上,真正完成功能的部分作为 Program(这个可以当做实际程序的 main 函数)运行。
其中最重要的2个部分是 **Config **和 Fetcher

Config

overseer 通过 Config 结构提供了一些参数来控制自更新。

1
2
3
4
5
6
7
8
9
10
11
12
13
14
15
16
17
18
19
20
21
22
23
24
25
26
27
28
29
30
31
32
33
34
35
36
37
// Config defines overseer's run-time configuration
type Config struct {
//Required will prevent overseer from fallback to running
//running the program in the main process on failure.
Required bool
//Program's main function
Program func(state State)
//Program's zero-downtime socket listening address (set this or Addresses)
Address string
//Program's zero-downtime socket listening addresses (set this or Address)
Addresses []string
//RestartSignal will manually trigger a graceful restart. Defaults to SIGUSR2.
RestartSignal os.Signal
//TerminateTimeout controls how long overseer should
//wait for the program to terminate itself. After this
//timeout, overseer will issue a SIGKILL.
TerminateTimeout time.Duration
//MinFetchInterval defines the smallest duration between Fetch()s.
//This helps to prevent unwieldy fetch.Interfaces from hogging
//too many resources. Defaults to 1 second.
MinFetchInterval time.Duration
//PreUpgrade runs after a binary has been retrieved, user defined checks
//can be run here and returning an error will cancel the upgrade.
PreUpgrade func(tempBinaryPath string) error
//Debug enables all [overseer] logs.
Debug bool
//NoWarn disables warning [overseer] logs.
NoWarn bool
//NoRestart disables all restarts, this option essentially converts
//the RestartSignal into a "ShutdownSignal".
NoRestart bool
//NoRestartAfterFetch disables automatic restarts after each upgrade.
//Though manual restarts using the RestartSignal can still be performed.
NoRestartAfterFetch bool
//Fetcher will be used to fetch binaries.
Fetcher fetcher.Interface
}

一般用不到这么多参数,核心的是:

  • Program
  • Fetcher

常用有:

  • Address
  • Addresses
  • MinFetchInterval
  • PreUpgrade

Fetcher

除了 Config,overseer 中另一个重要的接口就是 Fetcher。
Fetcher 接口定义了程序如何初始化和更新

1
2
3
4
5
6
7
8
9
10
11
12
13
14
15
16
17
18
19
package fetcher

import "io"

// Interface defines the required fetcher functions
type Interface interface {
//Init should perform validation on fields. For
//example, ensure the appropriate URLs or keys
//are defined or ensure there is connectivity
//to the appropriate web service.
Init() error
//Fetch should check if there is an updated
//binary to fetch, and then stream it back the
//form of an io.Reader. If io.Reader is nil,
//then it is assumed there are no updates. Fetch
//will be run repeatedly and forever. It is up the
//implementation to throttle the fetch frequency.
Fetch() (io.Reader, error)
}

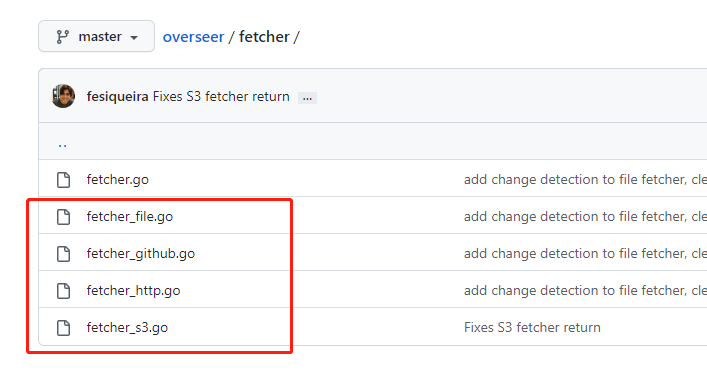
overseer 只带了几个实现好了的 Fetcher,可以满足大部分需求,也可以自己继承 Fetcher 接口实现自己的 Fetcher。
image.png

简单的自升级示例

演示自动升级,我们需要编译2个版本的程序。

示例如下:

1
2
3
4
5
6
7
8
9
10
11
12
13
14
15
16
17
18
19
20
21
22
23
24
25
26
27
28
29
30
31
32
33
34
35
36
37
38
39
package main

import (
"fmt"
"time"

"github.com/jpillora/overseer"
"github.com/jpillora/overseer/fetcher"
)

const version = "v0.1"

// 控制自升级
func main() {
overseer.Run(overseer.Config{
Program: actualMain,
TerminateTimeout: 10 * time.Second,
Fetcher: &fetcher.HTTP{
URL: "http://localhost:9000/selfupgrade",
Interval: 1 * time.Second,
},
PreUpgrade: preUpgrade,
})
// mainWithSelfUpdate()
}

// 升级前的动作,参数是下载的程序的临时位置,如果返回 error,则不升级
func preUpgrade(tempBinaryPath string) error {
fmt.Printf("download binary path: %s\n", tempBinaryPath)
return nil
}

// 这里一般写是实际的业务,此示例是不断打印 version
func actualMain(state overseer.State) {
for {
fmt.Printf("%s: current version: %s\n", time.Now().Format("2006-01-02 15:04:05"), version)
time.Sleep(3 * time.Second)
}
}

上面的程序编译后启动。

1
2
3
4
5
6
7
8
$ go build -o selfupgrade

$ ./selfupgrade
2022-05-21 00:46:52: current version: v0.1
2022-05-21 00:46:55: current version: v0.1
2022-05-21 00:46:58: current version: v0.1
2022-05-21 00:47:01: current version: v0.1
2022-05-21 00:47:04: current version: v0.1

启动之后开始不断的打印版本号(间隔3秒)。不要停止此程序。

然后我们修改 version,并且将 actualMain 中的间隔修改为5秒。

1
2
3
4
5
6
7
8
9
10
11
const version = "v0.2"  // v0.1 => v0.2

// 。。。 省略。。。

// 这里一般写是实际的业务,此示例是不断打印 version
func actualMain(state overseer.State) {
for {
fmt.Printf("%s: current version: %s\n", time.Now().Format("2006-01-02 15:04:05"), version)
time.Sleep(5 * time.Second)
}
}

修改之后,再编译一个版本到 ~/tmp 目录(如果不存在提前创建)。
然后启动一个文件服务,我用python自带的方法启动了一个服务,服务端口对应代码中的升级URL(”http://localhost:9000/selfupgrade"

1
2
3
$ go build -o ~/tmp/selfupgrade 
$ cd ~/tmp
$ python -m http.server 9000

过一会儿之后,就能看到之前启动程序已经更新。
更新之后版本号变成 v0.2,时间间隔变成了5秒

1
2
3
4
5
6
7
8
9
10
2022-05-21 01:27:22: current version: v0.1
2022-05-21 01:27:25: current version: v0.1
download binary path: /tmp/overseer-5c0865554eb0f83a
2022-05-21 01:27:28: current version: v0.1
2022-05-21 01:27:31: current version: v0.1
2022-05-21 01:27:34: current version: v0.1
2022-05-21 01:27:37: current version: v0.1
2022-05-21 01:27:37: current version: v0.2
2022-05-21 01:27:42: current version: v0.2
2022-05-21 01:27:47: current version: v0.2

Web服务自升级示例

web服务与之类似,比如:

1
2
3
4
5
6
func actualMainServer(state overseer.State) {
http.Handle("/", http.HandlerFunc(func(w http.ResponseWriter, r *http.Request) {
fmt.Fprintf(w, "%s: current version: %s\n", time.Now().Format("2006-01-02 15:04:05"), version)
}))
http.ListenAndServe(":8000", nil)
}

将上面函数替换 overseer.Config 的Program即可。

通过观察进程的变化,可以看出升级之后就是将子进程重启,主进程没变。

升级前:

1
2
3
4
$ ps -ef | ag self
wangyub+ 8058 4443 1 09:58 pts/12 00:00:00 ./selfupgrade
wangyub+ 8067 8058 0 09:58 pts/12 00:00:00 ./selfupgrade
wangyub+ 8130 3548 0 09:59 pts/11 00:00:00 ag self

升级后:

1
2
3
4
$ ps -ef | ag self
wangyub+ 8058 4443 0 09:58 pts/12 00:00:00 ./selfupgrade
wangyub+ 8196 8058 0 09:59 pts/12 00:00:00 ./selfupgrade
wangyub+ 8266 3548 0 09:59 pts/11 00:00:00 ag self

上面的写法,会导致端口的服务中断一会儿,如果要保持端口持续畅通,可以用官方示例中的写法。

1
2
3
4
overseer.Run(overseer.Config{
// 。。。省略。。。
Address: ":8000", // 服务的端口
})

实际的server中使用 state 中的 Listener。

1
2
3
4
5
6
func actualMainServer(state overseer.State) {
http.Handle("/", http.HandlerFunc(func(w http.ResponseWriter, r *http.Request) {
fmt.Fprintf(w, "%s: current version: %s\n", time.Now().Format("2006-01-02 15:04:05"), version)
}))
http.Serve(state.Listener, nil) // 这里使用 state 中的 Listener,也就是 Config中的 Address
}

总结

总的来说,overseer 满足了自升级的各种需求。
但是自带的Fetcher功能比较简单,比如HTTP的Fetcher,升级的过程可能只有一个URL还不够,还有更加复杂的版本检查和比较。
实际场景下可能需要定制一个适合自己应用的Fetcher。

CloudflareSpeedTest 更新检测代码

CloudflareSpeedTest 也简单实现了代码更新方案

https://github.com/XIU2/CloudflareSpeedTest

1
2
3
4
5
6
7
8
9
10
11
12
13
14
15
16
17
18
19
20
21
22
23
24
25
26
27
28
29
30
31
32
33
34
35
36
37
38
39
40
41
42
43
44
45
46
47
48
49
50
51
52
53
54
55
56
57
58
59
60
61
62
63
64
65
66
67
68
69
70
71
72
73
74
75
76
77
78
79
80
81
82
83
84
85
86
87
88
89
90
91
92
93
94
95
96
97
98
99
100
101
102
103
104
105
106
107
108
109
110
111
112
113
114
115
116
117
118
119
120
121
122
123
124
125
126
127
128
129
130
131
132
133
134
135
136
137
138
139
140
141
142
143
144
145
146
147
148
149
150
package main

import (
"flag"
"fmt"
"io/ioutil"
"net/http"
"os"
"runtime"
"time"

"CloudflareSpeedTest/task"
"CloudflareSpeedTest/utils"
)

var (
version, versionNew string
)

func init() {
var printVersion bool
var help = `
CloudflareSpeedTest ` + version + `
测试 Cloudflare CDN 所有 IP 的延迟和速度,获取最快 IP (IPv4+IPv6)!
https://github.com/XIU2/CloudflareSpeedTest
参数:
-n 200
测速线程数量;越多测速越快,性能弱的设备 (如路由器) 请勿太高;(默认 200 最多 1000)
-t 4
延迟测速次数;单个 IP 延迟测速次数,为 1 时将过滤丢包的IP,TCP协议;(默认 4 次)
-tp 443
指定测速端口;延迟测速/下载测速时使用的端口;(默认 443 端口)
-dn 10
下载测速数量;延迟测速并排序后,从最低延迟起下载测速的数量;(默认 10 个)
-dt 10
下载测速时间;单个 IP 下载测速最长时间,不能太短;(默认 10 秒)
-url https://cf.xiu2.xyz/url
下载测速地址;用来下载测速的 Cloudflare CDN 文件地址,默认地址不保证可用性,建议自建;
-tl 200
平均延迟上限;只输出低于指定平均延迟的 IP,可与其他上限/下限搭配;(默认 9999 ms)
-tll 40
平均延迟下限;只输出高于指定平均延迟的 IP,可与其他上限/下限搭配、过滤假墙 IP;(默认 0 ms)
-sl 5
下载速度下限;只输出高于指定下载速度的 IP,凑够指定数量 [-dn] 才会停止测速;(默认 0.00 MB/s)
-p 10
显示结果数量;测速后直接显示指定数量的结果,为 0 时不显示结果直接退出;(默认 10 个)
-f ip.txt
IP段数据文件;如路径含有空格请加上引号;支持其他 CDN IP段;(默认 ip.txt)
-o result.csv
写入结果文件;如路径含有空格请加上引号;值为空时不写入文件 [-o ""];(默认 result.csv)
-dd
禁用下载测速;禁用后测速结果会按延迟排序 (默认按下载速度排序);(默认 启用)
-ipv6
IPv6测速模式;确保 IP 段数据文件内只包含 IPv6 IP段,软件不支持同时测速 IPv4+IPv6;(默认 IPv4)
-allip
测速全部的IP;对 IP 段中的每个 IP (仅支持 IPv4) 进行测速;(默认 每个 IP 段随机测速一个 IP)
-v
打印程序版本+检查版本更新
-h
打印帮助说明
`
var minDelay, maxDelay, downloadTime int
flag.IntVar(&task.Routines, "n", 200, "测速线程数量")
flag.IntVar(&task.PingTimes, "t", 4, "延迟测速次数")
flag.IntVar(&task.TCPPort, "tp", 443, "指定测速端口")
flag.IntVar(&maxDelay, "tl", 9999, "平均延迟上限")
flag.IntVar(&minDelay, "tll", 0, "平均延迟下限")
flag.IntVar(&downloadTime, "dt", 10, "下载测速时间")
flag.IntVar(&task.TestCount, "dn", 10, "下载测速数量")
flag.StringVar(&task.URL, "url", "https://cf.xiu2.xyz/url", "下载测速地址")
flag.BoolVar(&task.Disable, "dd", false, "禁用下载测速")
flag.BoolVar(&task.IPv6, "ipv6", false, "启用IPv6")
flag.BoolVar(&task.TestAll, "allip", false, "测速全部 IP")
flag.StringVar(&task.IPFile, "f", "ip.txt", "IP 数据文件")
flag.Float64Var(&task.MinSpeed, "sl", 0, "下载速度下限")
flag.IntVar(&utils.PrintNum, "p", 10, "显示结果数量")
flag.StringVar(&utils.Output, "o", "result.csv", "输出结果文件")
flag.BoolVar(&printVersion, "v", false, "打印程序版本")
flag.Usage = func() { fmt.Print(help) }
flag.Parse()

if task.MinSpeed > 0 && time.Duration(maxDelay)*time.Millisecond == utils.InputMaxDelay {
fmt.Println("[小提示] 在使用 [-sl] 参数时,建议搭配 [-tl] 参数,以避免因凑不够 [-dn] 数量而一直测速...")
}
utils.InputMaxDelay = time.Duration(maxDelay) * time.Millisecond
utils.InputMinDelay = time.Duration(minDelay) * time.Millisecond
task.Timeout = time.Duration(downloadTime) * time.Second

if printVersion {
println(version)
fmt.Println("检查版本更新中...")
checkUpdate()
if versionNew != "" {
fmt.Printf("*** 发现新版本 [%s]!请前往 [https://github.com/XIU2/CloudflareSpeedTest] 更新! ***", versionNew)
} else {
fmt.Println("当前为最新版本 [" + version + "]!")
}
os.Exit(0)
}
}

func main() {
go checkUpdate() // 检查版本更新
task.InitRandSeed() // 置随机数种子

fmt.Printf("# XIU2/CloudflareSpeedTest %s \n\n", version)

// 开始延迟测速
pingData := task.NewPing().Run().FilterDelay()
// 开始下载测速
speedData := task.TestDownloadSpeed(pingData)
utils.ExportCsv(speedData)
speedData.Print(task.IPv6)

if versionNew != "" {
fmt.Printf("\n*** 发现新版本 [%s]!请前往 [https://github.com/XIU2/CloudflareSpeedTest] 更新! ***\n", versionNew)
}
endPrint()
}

func endPrint() {
if utils.NoPrintResult() {
return
}
if runtime.GOOS == "windows" { // 如果是 Windows 系统,则需要按下 回车键 或 Ctrl+C 退出(避免通过双击运行时,测速完毕后直接关闭)
fmt.Printf("按下 回车键 或 Ctrl+C 退出。")
var pause int
fmt.Scanln(&pause)
}
}

// 检查更新
func checkUpdate() {
timeout := 10 * time.Second
client := http.Client{Timeout: timeout}
res, err := client.Get("https://api.xiu2.xyz/ver/cloudflarespeedtest.txt")
if err != nil {
return
}
// 读取资源数据 body: []byte
body, err := ioutil.ReadAll(res.Body)
if err != nil {
return
}
// 关闭资源流
defer res.Body.Close()
if string(body) != version {
versionNew = string(body)
}
}

QQ群:397745473

欢迎关注我的其它发布渠道